How to Migrate Compiere ERP to 3.8.19 Version?
Use the instructions below to migrate Compiere ERP from any lower version to Compiere 3.8.19.
Prerequisites
The following are the prerequisites for migrating Compiere 3.8.19:
- A valid support contract
- Java JDK 8 or OpenJDK 8 (Not just JRE)
- Database Oracle XE, Oracle 10g Release 2, Oracle 11g Release 2, Oracle 12c or EnterpriseDB Postgres Plus Advanced Server 8.4 or later
Preserving Customizations in Compiere ERP
Compiere ERP will not change any customizations you did if you have properly marked it as customizations. By default, all records added to the dictionary will have the entity type “User Maintained”.

For changes to existing dictionary records, select Customizations in the Change Audit window to denote the updates which has to be preserved before initiating the migration process. To confirm whether all the updated dictionary records have been updated to preserve these customizations, run the process in test mode before commencing the migration.
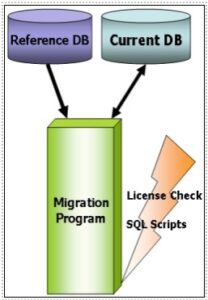
Compiere ERP Migration Process
Compiere ERP migration process consists of the following steps:
- Preparation
- Test Mode (optional)
- Migrate to a New Release
Preparation
Verify the following before you initiate the migration process:
- Server access to internet for http (port 80) and https (port 443).
- Stop the application server by executing utils/RUN_Server2Stop.
- Back up the database.
If you are running EnterpriseDB 8.2 or earlier, upgrade it to EnterpriseDB Postgres Plus Advanced Server 8.3.
Test Mode (optional)
This is an optional step where you can run the migration task in test mode. This helps you to review and find out the precautionary steps to take while running it against the database in live.
Note: In test mode, resolve ID conflicts will not show the correct future IDs
You may encounter some errors in test mode because the database changes are not being executed. Also, you can evaluate the schema changes to be made.
For a regular migration, follow the “RUN_setup” steps as such given in the next section. In Step 18, do not forget to select the “Test Only” box.
If the program mentions some of the tables which you needed for deletion, just recreate those tables in the data dictionary (Window Table / Column) with the Entity Type as “User Defined” or with an entity type of your own.
If the program marks few required columns for deletion, ensure that the column has the Entity Type as “User” or “Application”. If the required column has the Entity Type as “Data Dictionary” or “Compiere” and marked for deletion as well, then copy it with some other name and mark the new column as “Custom” or “Application”. The same applies to windows, tabs, fields, and so on.
The Mandatory User or Application Columns must have a default value defined.
Migrating Compiere ERP to 3.8.19
Are you migrating to Compiere 3.8.19 by using JBoss as the application server? JBoss will not be available in the Compiere installation package. You have to remove the folder name “JBoss” from the “compiere2” folder on your machine. Please refer to the screenshot given below.
For migrating from 3.0.x, you have to remove all the .car files from the folder Compiere2/data too.

Steps to migrate to Compiere 3.8.19:
- Download and unzip/untar the distribution file (Ex: Compiere_3.8.19.zip). Ensure to overwrite any existing files.
- Execute “RUN_setup”.
- In the Deployment field, ensure that the location where the application server is installed on your machine is specified. For example, C:\wildfly-8.2.0.Final.

- Review all the environment settings and click “Save”.
While validating the parameters, a red icon will show right next to the parameter that has error. Fix the error by making changes, click “Test” to validate again, and then click “Save”.

- Click Yes, I Understand and Accept.
If security key file is not set, the following prompt appears.

- Click OK.
- If you are a new customer, fill in all the needed information. If you are an existing customer, provide all the subscriber information (System Name, Email and Password) same as while registering in the Compiere Web Store so that you can get a complete list of applications.
- Click “Check available Applications” to get a list of applications available for installation.

Note: For installing additional applications in latest the Compiere Core version post-installation or migration, you have to choose Compiere Core plus and any additional applications to install, and then run the Migration process. Compiere Standard is the core application that must “always” be installed or migrated to the latest release, but you can also select additional applications provided by Compiere or any of our authorized partners.
- Choose the applications you would like to migrate and click “Reinstall/Migrate”. If you do not want to install or migrate any of the applications listed, change the action to “None”. To install new applications, change the action to “New Install”.
Note: On giving incorrect email or password, or no internet connection, you can’t select Compiere Enterprise, or any other optional components.
- Next, read and accept the Compiere Public License Agreement. To accept, click “Yes, I Understand and Accept”.
You might get more than one license agreement depending on the applications that you are installing. Note that XUOM is a sample application extension.

- For Compiere Enterprise edition installation, read and accept the commercial license agreement.
- Click Start File Installation.

- When the file installation is complete, click Start Migrate Database.

- Enter the System Name, Registered Email, and Password. The data entered must match the Compiere Web store registration details.
- Click “Check License” to validate your asset information.
Note: The asset information may already be included if it was entered in the system window.

If you get the “Core Invalid” error after clicking “Check License”, it denotes that you did not select the appropriate action for the core component. If so, close the setup and support windows, and execute RUN_setup file again and select Standard plus or any other component for installation.
- Click Start Migration.

- Click “Yes” in the Compiere Version Migration Prompt.

- Click “Start”.
Note: Do not select Test Only check box.

- Click “Yes” to confirm that you do have a backup of your database.

- Click “Yes” to confirm that the Source and Target database versions from the Compiere Version Migration window are correct.

- Check if the migration process has been finished without any errors and the message, “Migration Done” appears.
Note: If you get any errors, review the list of known issues listed in this document before logging a service request.

- Review the following log files for errors in the Compiere2 folder:
a. Migrate_yyyy_mm_dd_hh_mi_ss.log: Complete logs file of the migration process.
b. Migrate_yyyy_mm_dd_hh_mi_ss.err.log: A subset of log with just errors.
c. yyyy-mm-dd_#.log: Possible additional errors not printed to the migration log. Ex: Search for the file with the text “Compiere Migration 3.8”)
Note: If you get any errors, review the list of known issues listed in this document before logging a service request.
- If you have a Compiere Enterprise Edition license, execute utils/RUN_Support, and click “Check License” to activate your license.

- Click the “Check License” button to see whether your Enterprise License is activated.

- Click “Close” after the Compiere Enterprise license is updated.
Note: Do not click Start Migration.
- Start the application server.
To start the Compiere web user interface after migration, empty the browser cache first.
Contact TenthPlanet, If you are Looking for a Service Provider to Migrate Your Compiere ERP to 3.8.19.
