How to install Compiere ERP 3.8.19 Version

For your new installation of Compiere ERP needs, follow the instructions below.
Prerequisites of Compiere ERP installation
The following are the prerequisites for a new installation of Compiere ERP:
- Java JDK 8 or OpenJDK 8 (Not just JRE)
- Application server: Tomcat Version 7 or Wildfly 8.2.0.Final
- Database Oracle XE, Oracle 10g Release 2, Oracle 11g Release 2, Oracle 12c or
- EnterpriseDB Postgres Plus Advanced Server 8.3 or Later
Note: It is better to you use a Unicode character set.
- Database approved Linux Operating System
- Windows 2008, Windows 7, or Windows 2012 l Disk Space: > 5 GB (includes database)
- Swap Space: > 2GB l Memory: > 1 GB Linux > 4GB Windows
- TCP/IP connection
- Network setup with DNS server and a domain. Do not use IP addresses
- Internet access
Note: The screenshots given in this page is for the installation of Compiere 3.8.19 on Windows. The installation process for Linux is same as windows, except the paths (Ex: C:\Compiere2 versus. /Compiere2) and the extension of the scripts (.bat vs. .sh).
Installing Database
To know how to install Oracle XE and EnterpriseDB on Windows and Linux, use the install guide on the Compiere website
If you are using Oracle XE, you have to change the following database parameters:
- Start SQL*Plus (Start > Programs > Oracle Database 10g Express Edition > Run SQL Command Line)
- Connect system/xxxx
- Alter system set processes=100 scope=spfile;
- Restart the database (Start > Programs > Oracle Database 10g Express Edition > Stop DB and then Start DB)
Installing Java
Download and install Java JDK 8 or OpenJDK 8. For installation instructions, see the JDK section
Note: Compiere ERP server needs JDK (not just JRE).
Installing Application Server
Use Wildfly 8.2.0.Final version or the latest version of Apache Tomcat as the Application Server.
Installing Wildfly
Download and install Wildfly 8.2.0.Final using the link http://wildfly.org/downloads/.
Installing Tomcat
Download and install Apache Tomcat 7.0 or higher. Click here for installation instructions
Note: Before starting Compiere, Tomcat application server must be started. This will typically be run as a daemon process and will be started automatically.
The following are the configuration settings for Tomcat:
UNIX: $CATALINA_HOME/bin/setenv.sh with contents
export JAVA_OPTS=”-server –Xms256m –Xmx1024m”
The following are the configuration settings for Windows:
For Windows you must have the following in setenv.bat:
set JAVA_OPTS=-server –Xms256m –Xmx1024m
To update tomcat service memory heap, run tomcat7w.exe command from <CATALINA_HOME>/bin folder and then update
Installing Compiere
The following instructions are meant for a new installation of Compiere ERP.
Use the following steps to install or set up Compiere Server (this includes the Compiere client as well).
- Download the latest version of Compiere ERP.
- Extract the .zip file. For example, C:\Compiere2 in Windows or /Compiere2 in Linux.
- Set the JAVA_HOME system variable to the location of your java JDK installation (for example, C:\Program Files\Java\jdk1.8.0_51) and add JAVA_HOME/bin to the PATH. For more information, click here.
- Verify that the bin directory for your database executables is included in the PATH. Also, if using Oracle XE on Linux, run $ORACLE_HOME/bin/oracle_env.sh.
- Set the COMPIERE_HOME system variable to the path of your Compiere installation (for example, C:\Compiere2).
- Execute the script $COMPIERE_HOME/RUN_Setup. Note: Compiere requires an internet connection for installation. If you are using a proxy server, modify the script, Compiere2/RUN_setup, to set your proxy options.
- Select the Server Type (Wildfly or Tomcat).
- In Deployment, enter the path where the application server is installed.
- Select the Database Type (Oracle XE, Oracle (for Standard or Enterprise Editions) or PostgreSQL (for EnterpriseDB).
- For System Password, enter the System database User password (for example, manager).
- For Database Password, enter the Compiere database user password, (for example, ‘compiere’).
- In the Application Server, Database Server, and Mail Server fields, use the DNS name of the server. Do not use local host (127.0.0.1) or IP addresses.
- Enter or update any other parameters as necessary.
- Click Get Help for information on any field.
- Click Save.

The Key Store Dialog box appears
- Click OK.

The Compiere Public License screen appears.
Yes, I understand and Accept
The following prompt appears describing your new Security Key.

Click OK.
- Enter the correct Subscriber Information.
Note: If you are an existing customer, you must fill the subscriber information (System Name, Email, and Password) same as while you registered in the Compiere Web Store so that it will list the available applications for you).
Click Check Available Applications to get a list of applications that are available to be installed. If you are a Community Edition user, leave the fields blank, and click Check available components to install the Community Edition.

Select the applications that you would like to install.
Note: You can include additional applications by using Add Application. By default, all available applications will be installed. If you do not wish to install one of them, you should change the action field from “New Install” to “-None-“. But you must select Compiere Core as it is a Mandatory Prerequisite.
- Click OK.
Note: Make sure you have given the correct email or password and have an internet connection. Otherwise, you cannot select Compiere Enterprise or any other optional components.
- In the Compiere Public License agreement and Compiere Commercial License agreement screens that appear, click Yes, I Understand and Accept.
You might get more than one license agreement, depending on the applications that you are installing.
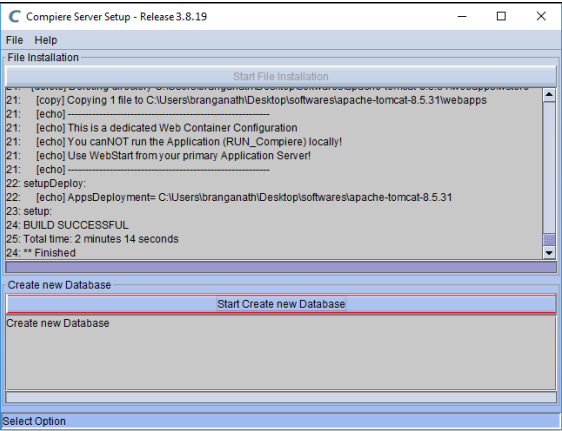
- Click Start File Installation.

Note: Here, you should have internet connection to continue; if not, installation will not succeed.
Once the file installation is complete, click Start Create new Database.
Note: If you already have a Compiere database in your system, you will be presented with a split screen. Click Start DROP OLD and create NEW Database if you want to replace the existing database with a new database.

- Click Yes to drop the existing database and create a new database.

If you choose to replace the existing database, all data in the existing database will be removed.
25. Verify that you see a “10: ** Finished’ message at the end of this step. Then a new window should pop-up to do the license validation. The Compiere Support window appears.
- Complete the necessary fields to validate your assets.
If you only intend to use the Community Edition of Compiere 3.0, you can skip the following steps and go to the Application Server section.
For customers with a valid support contract with Compiere, this is a required step to ensure that the features associated with the support level are enabled.
If you are a customer and do not have a web store login, contact your system administrator or Compiere Support first.
If you are not a customer and would like to obtain a trial license for the Enterprise Edition, Contact Us.
- Provide the following information in exactly the same way as it was registered in the Compiere Web store, and click Check License to validate your asset information.
- System Name: The name provided during the web store registration.
- Registered Email: The email address provided during the web store registration.
- Password: The web store password.
- To verify your license, click Check License. Note: Do not click Start Migration.
- Review whether your license information has been validated. If you have a trial license for Compiere Enterprise edition, but you currently do not have a license with Compiere, you will see that the license for Standard is invalid. This is expected as the trial does not include Standard and you may ignore the error.

- After the Compiere license has been verified, click Close.
Note: If you get the error, “You do not have an appropriate license to use this feature,” when starting the web UI, then log in to the server and execute utils/RUN_Support to validate your license again and restart the application server. When using the Swing client, ensure that your database connection information matches exactly with the information in the target URL in RUN_Support (including the fully qualified server name).
- Close any additional Setup, or Support windows.
Running the Application Server
Before you access the Compiere web user interface, you must start the application server.
Use the following steps to start the application server:
- To start the application server, do the following:
- If you are using JBoss, go to the location where you have installed the application server, and run Standalone.bat from the bin folder. (For example, C:\wildfly-8.2.0.Final > bin > Standalone.bat).
- If you are using Apache Tomcat, run Startup.bat from the bin folder (For example, C:\tomcat\apache-tomcat-7.0.28 > bin > Startup.bat).
- Check the logs files from the following locations for any errors:
- C:\wildfly-8.2.0.Final\standalone\log
- C:\apache-tomcat-7.0.28\logs
Common problems
The common problems include ports already in use:
- 17:41:09,085 ERROR [NamingService] Could not start on port 1099
- java.net.BindException: Address already in use
- JVM_Bind at java.net.PlainSocketImpl.socketBind(Native Method)
- There is another program using port 1099; Stop it and restart Run_Server2 or setup Compiere to use another port in RUN_setup.
The following are the likely port conflicts:
- 80 – Other web server running (or you need privileges under Linux/Unix), or Skype
- 8080 – Used by Oracle Database
- 1099 – Often used by IDEs for debugging, or by internet messengers (for example, Skype, Google Talk, and so on).
Starting Compiere
Use the following steps to start Compiere:
- Start Compiere using any of the following methods:
To start the Swing client, double-click the Compiere shortcut on your desktop, or double-click RUN_Compiere2 from the $COMPIERE_HOME directory.
The default users and passwords for the sample Garden World application is as follows:
- GardenUser/GardenUser
- GardenAdmin/GardenAdmin
- System/System
- SuperUser/System

- If you have access to the Enterprise Edition, you can launch Compiere ERP from the browser by entering http://server:port/apps (for example, http://mycompany.com:80/apps) on the browser. For optimal performance, the Firefox browser is recommended for the Compiere web user interface.
Is your Compiere ERP becomes outdated?
Upgrade your Compeire ERP to the latest version using TenthPlanet.
