Secure authentication to Pentaho+ with Integrated Windows authentication
Pentaho+ can be configured to use many mechanisms for authentication and authorization, such as
the lightweight directory access protocol (LDAP) or database-based authentication (JDBC
authentication) from Microsoft Active Directory. This document aims to work through the steps needed to set up Pentaho+ to authenticate using Integrated Windows Authentication (IWA) with a pre-configured Microsoft (MS) Active Directory.
Prerequisites:
Configure active directory:
In this document we assume that the MSAD(Microsoft Active Directory) has been already setup.
Before we go into the configuration part we must understand few terminologies that are available in MSAD like 1)DN 2)DC 3)OU 4)CN
1) DN:- Distinguished Name, each entry has a unique identifier.
2) DC:- Domain Component, is the DN of the parent entry.
3) OU:- Organizational Unit.
4) CN:- Common Name, this is can be a user group name.
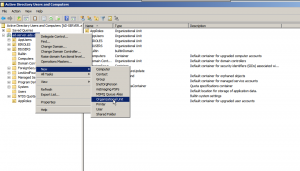
To configure the MSAD right click on the Active Directory server and select NEW and create a OU. example OU=BIUSERS, simillarly create another OU. example OU=BIROLES.
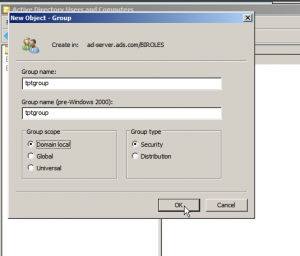
- In the next step select OU=BIROLES and right click on it, then select the NEW and create a group. Note:- Here select the group as Domain local.
- In the next step select OU=BIUSERS and right click on it, then select the NEW and create a USER (this will be the admin user in my case). Note:- Dont forget to select the password option as PASSWORD NEVER EXPIRES.
- After the user is created right click on OU=BIUSERS and select Deligate Control option, click NEXT and select ADD to add a user.
- In the dialogbox under ENTER THE OBJECT NAME type the USER created and add that user and click OK, in the next stage click NEXT .
- Select Create a custom task to deligate check-box and click NEXT and then select This Folder check box and again click NEXT,
- select Full control click NEXT and click Finish.
- Pentaho Plus Integration with Microsoft Active Directory:-
Login into the Pentaho+ User Console (PUC) and click on the HOME toggle button, and select the Administration. Then under the Administration select the Authentication option. - Provide the MSAD server login details and click on the Test Server Connection.
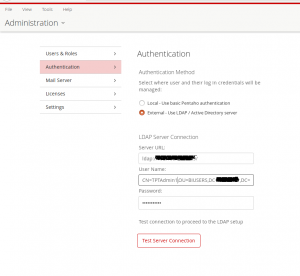
- After the connection is established , we should be able to browse the directories in the MSAD, here select the user that is created in the begining of configuring the MSAD.
- After the user selection , we have to select the role of the MSAD just like as we did for the user selection.
- Select the custom configuration and provide the search base for the user selected and keep the search filter value.
- In the Roles section keep the values for Role Attribute and Role Search Filter as shown in the below screen_shot. Note:- In the Role Search Filter provide the CN value as per the configs created , In my case it is (CN=tpt*).
- For the Group Search Base the value is same as the Role Search Base .
- Now click Save and Restart the Pentaho+ Server .
- Thats it Pentaho Plus BI Integration With Microsoft Active Directory is completed.
Installing and Configuring Tomcat IIS Connector
- Download Tomcat iis connector from the below link,
https://github.com/Bilal-S/iis2tomcat/releases - After installing the file, double click on the Connector_setup.
- License agreement box pops up, Click on I accept button.
- Now click next.
- Now enter the login server and login port which you are going to use, and click next.
- Click the Enable remote access to apache tomcat and click next.
- In the pre configure setting uncheck all check boxes and click next.
- Click the Let me choose specific site option and click next
- Now click on default web site and click next.
- Select handler mapping select all the check box and click next.
- Now Click on install.
Installation and Configuration of IIS Role
Here are the steps to add server roles:
- Under the Server Manager, select the Dashboard.
- Add a new Server Role.
- Under Roles, select Web Server (IIS).
- Select Application Development, and then select ISAPI Extensions and ISAPI Filters.
- Proceed to installation by clicking on Next, and then Install.
- Enable Windows Authentication
- Here are the steps for enabling Windows authentication:
- On IIS Manager, select the default website.
- Double-click on Authentication.
- Make sure Anonymous Authentication is disabled.
- Make sure Windows Authentication is enabled.
Pentaho+ Configurations:
This section contains the configuration steps for your Pentaho+ installation. You can find details on
these topics in the following sections:
- Set tomcatAuthentication to False
- Enable preAuthenticatedProcessingFilter
- Configure authenticationManager
- Configure preAuthenticatedProcessingFilter
- Configure preAuthenticationProvider
- Configure exceptionTranslationFilter
- Configure exceptionTranslationFilterForWS
- Set Tomcat Authentication to False
Follow these steps to set tomcatAuthentication to False:
1. Locate the following file: Pentaho-server/tomcat/conf/server.xml
2. Locate the AJP connector entry and change it from:
<!– Define an AJP 1.3 Connector on port 8009 –>
<Connector URIEncoding=”UTF-8″ port=”8009″ protocol=”AJP/1.3″
redirectPort=”8443″ />
To this:
<!– Define an AJP 1.3 Connector on port 8009 –>
<Connector URIEncoding=”UTF-8″ port=”8009″ protocol=”AJP/1.3″
enableLookups=”false” tomcatAuthentication=”false” redirectPort=”8443″ />
Enable Preauthenticated Processing Filter
These steps will help you enable preAuthenticatedProcessingFilter:
1. Locate the following file: \pentaho-server\pentaho-
solutions\system\applicationContext-spring-security.xml
2. Locate the filterChainProxy and replace the patterns using this text:
<sec:filter-chain pattern=”/api/repos/dashboards/print”
filters=”securityContextHolderAwareRequestFilter,httpSessionPentahoSessionC
ontextIntegrationFilter,httpSessionContextIntegrationFilter,preAuthenticate
dSecurityFilter,httpSessionReuseDetectionFilter,logoutFilter,authentication
ProcessingFilter,basicProcessingFilter,requestParameterProcessingFilter,ano
nymousProcessingFilter,sessionMgmtFilter,exceptionTranslationFilter,filtrate
nvocationInterceptor” />
<sec:filter-chain pattern=”/webservices/**”
filters=”httpSessionPentahoSessionContextIntegrationFilter,httpSessionConte
xtIntegrationFilter,preAuthenticatedProcessingFilter,basicProcessingFilter,
anonymousProcessingFilter,sessionMgmtFilter,securityContextHolderAwareReque
stFilterForWS,exceptionTranslationFilterForWS,filterInvocationInterceptorFo
rWS” />
<sec:filter-chain pattern=”/api/repos/**”
filters=”httpSessionPentahoSessionContextIntegrationFilter,httpSessionConte
xtIntegrationFilter,preAuthenticatedProcessingFilter,basicProcessingFilter,
requestParameterProcessingFilter,anonymousProcessingFilter,sessionMgmtFilte
r,securityContextHolderAwareRequestFilterForWS,exceptionTranslationFilterFo
rWS,filterInvocationInterceptorForWS,preFlightFilter” />
<sec:filter-chain pattern=”/api/**”
filters=”httpSessionPentahoSessionContextIntegrationFilter,httpSessionConte
xtIntegrationFilter,preAuthenticatedProcessingFilter,basicProcessingFilter,
requestParameterProcessingFilter,anonymousProcessingFilter,sessionMgmtFilte
r,securityContextHolderAwareRequestFilterForWS,exceptionTranslationFilterFo
rWS,filterInvocationInterceptorForWS” />
<sec:filter-chain pattern=”/plugin/reporting/api/jobs/**”
filters=”httpSessionPentahoSessionContextIntegrationFilter,httpSessionConte
xtIntegrationFilter,preAuthenticatedProcessingFilter,basicProcessingFilter,
requestParameterProcessingFilter,anonymousProcessingFilter,sessionMgmtFilte
r,securityContextHolderAwareRequestFilterForWS,exceptionTranslationFilterFo
rWS,filterInvocationInterceptorForWS,preFlightFilter” />
<sec:filter-chain pattern=”/plugin/**”
filters=”httpSessionPentahoSessionContextIntegrationFilter,httpSessionConte
xtIntegrationFilter,preAuthenticatedProcessingFilter,basicProcessingFilter,
requestParameterProcessingFilter,anonymousProcessingFilter,sessionMgmtFilte
r,securityContextHolderAwareRequestFilterForWS,exceptionTranslationFilterFo
rWS,filterInvocationInterceptorForWS” />
<sec:filter-chain pattern=”/**”
filters=”httpSessionPentahoSessionContextIntegrationFilter,httpSessionConte
xtIntegrationFilter,httpSessionReuseDetectionFilter,logoutFilter,preAuthent
icatedProcessingFilter,authenticationProcessingFilter,basicProcessingFilter
,requestParameterProcessingFilter,anonymousProcessingFilter,sessionMgmtFilt
er,securityContextHolderAwareRequestFilter,exceptionTranslationFilter,filte
rInvocationInterceptor” />
Configure Authentication Manager
Follow these steps to configure authenticationManager:
1. Locate the following file: \pentaho-server\pentaho-
solutions\system\applicationContext-spring-security.xml
2. Replace the following authenticationManager:
<bean id=”authenticationManager”
class=”org.springframework.security.authentication.ProviderManager”>
<constructor-arg>
<util:list>
<pen:bean
class=”org.springframework.security.authentication.AuthenticationProvider”/
>
<ref bean=”anonymousAuthenticationProvider” />
</util:list>
</constructor-arg>
<property name=”authenticationEventPublisher”>
<ref bean=”defaultAuthenticationEventPublisher” />
</property>
</bean>
3. Add the following authenticationManager:
<!– ================ AUTHENTICATION ======================= –>
<bean id=”authenticationManager”
class=”org.springframework.security.authentication.ProviderManager”>
<constructor-arg>
<util:list>
<ref bean=”preAuthAuthenticationProvider” />
<ref bean=”anonymousAuthenticationProvider”/>
</util:list>
</constructor-arg>
<property name=”authenticationEventPublisher”>
<ref bean=”defaultAuthenticationEventPublisher” />
</property>
</bean>
Configure Preauthenticated Processing Filter
In the same file, add the following bean for preAuthenticatedProcessingFilter:
<!— IWA —>
<bean id=”preAuthenticatedProcessingFilter”
class=”org.pentaho.platform.web.http.security.UsernameSubstringPreAut
henticatedProcessingFilter”>
<property name=”authenticationManager”>
<ref bean=”authenticationManager”/>
</property>
<property name=”regex” value=”.+\\(.+)”/>
</bean>
Configure Preauthentication Provider
In the same file, add the following bean for preAuthAuthenticationProvider, just below the
preAuthenticationProcessingFilter:
<bean id=”preAuthAuthenticationProvider”
class=”org.springframework.security.web.authentication.preauth.PreAuthentic
atedAuthenticationProvider” >
<property name=”preAuthenticatedUserDetailsService”>
<bean id=”userDetailsServiceWrapper”
class=”org.springframework.security.core.userdetails.UserDetailsByNameServi
ceWrapper”>
<property name=”userDetailsService”
ref=”ldapUserDetailsService” />
</bean>
</property>
</bean>
Configure Exception Translation Filter
Here are the steps for configuring exceptionTranslationFilter:
1. Locate the following file: \pentaho-server\pentaho-
solutions\system\applicationContext-spring-security.xml
2. Locate the following bean, exceptionTranslationFilter:
<bean id=”exceptionTranslationFilter”
class=”org.springframework.security.web.access.ExceptionTranslationFilter”>
<constructor-arg ref=”authenticationProcessingFilterEntryPoint”/>
<property name=”accessDeniedHandler”>
<bean
class=”org.springframework.security.web.access.AccessDeniedHandlerImpl” />
</property>
</bean>
3. Replace it with the following bean declaration:
<bean id=”exceptionTranslationFilter”
class=”org.springframework.security.web.access.ExceptionTranslationFilter”>
<constructor-arg ref=”preAuthenticatedProcessingFilterEntryPoint” />
<property name=”accessDeniedHandler”>
<bean
class=”org.springframework.security.web.access.AccessDeniedHandlerImpl” />
</property>
</bean>
4. Add the following bean, below the exceptionTranslationFitler:
<bean id=”preAuthenticatedProcessingFilterEntryPoint”
class=”org.springframework.security.web.authentication.Http403ForbiddenEntr
yPoint” />
Configure Exception Translation Filter for WS
These steps will help you configure exceptionTranslationFilterForWS:
1. Locate the following bean:
<bean id=”exceptionTranslationFilterForWS”
class=”org.springframework.security.web.access.ExceptionTranslationFilter”>
<constructor-arg ref=”basicProcessingFilterEntryPoint”/>
<property name=”accessDeniedHandler”>
<bean
class=”org.springframework.security.web.access.AccessDeniedHandlerImpl” />
</property>
</bean>
2. Replace it with the following bean:
<bean id=”exceptionTranslationFilterForWS”
class=”org.springframework.security.web.access.ExceptionTranslationFilter”>
<constructor-arg ref=”preAuthenticatedProcessingFilterEntryPoint” />
<property name=”accessDeniedHandler”>
<bean
class=”org.springframework.security.web.access.AccessDeniedHandlerImpl” />
</property>
</bean>
3. Save your changes.
4. Restart Pentaho+ Server.
5. Test the changes. You should be able to log into the URL served by IIS. Go to Internet
Explorer and type the following URL: http://localhost/pentaho/.
