Enable secured network transmission using HTTPS over web
1. Introduction
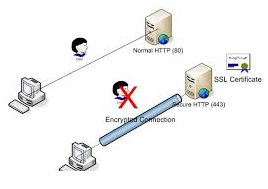
SSL, or Secure Socket Layer, is a technology which allows web browsers and web servers to communicate over a secured connection. This means that the data being sent is encrypted by one side, transmitted, and then decrypted by the other side before processing. This is a two-way process, meaning that both the server AND the browser encrypt all traffic before sending out data.
In order to implement SSL, a web server must have an associated Certificate for each external interface (IP address) that accepts secure connections.
By default, the Pentaho BA Server and Pentaho User Console are configured to communicate over HTTP.
HTTPS can be applied based on your scenario.
SSL in the Pentaho BA Server with a Certificate Authority
If you already have an SSL certificate through a certificate authority such as Thawte or Verisign, all you have to do to use it with the Pentaho BA Server and User Console is configured your application server to use it.
For the certificate to work in the visitors browsers without warnings, it needs to be signed by a trusted third party. These are called Certificate Authorities (CAs).
SSL in the Pentaho BA Server with a Self-Signed Certificate
Self-signed SSL certificates can be used to set up temporary ssl servers. You can use it for test and development servers where security is not a big concern.
Java provides a relatively simple command-line tool, called key tool, which can easily create a “self-signed” Certificate
2. SSL Configuration
2.1Enable SSL in the Pentaho BA Server with a Certificate Authority
Create a local Certificate Signing Request (CSR)
In order to obtain a Certificate from the Certificate Authority of our choice, we have to create a so called Certificate Signing Request (CSR). That CSR will be used by the Certificate Authority to create a Certificate that will identify your website as “secure”.
To create a CSR follow these steps:
- Create a local self-signed Certificate (as described in the previous section): key tool -genkey -alias tomcat -keyalg RSA -keystore <your_keystore_filename>
The CSR is then created with:
keytool -certreq -keyalg RSA -alias tomcat -file certreq.csr -keystore <your_keystore_filename>
- Now we have a file called certreq.csr that you can submit to the Certificate Authority (like verisign.com, thawte.com or trustcenter.de). In return, we get a Certificate.
Importing the Certificate
- Now that we have our Certificate we can import it into our local key store.
- First of all we have to import a so called Chain Certificate or Root Certificate into our key store.
- After that we can, proceed with importing our Certificate.
- Download a Chain Certificate from the Certificate Authority we obtained the Certificate from.
- Import the Chain Certificate into your keystore keytool -import -alias root -keystore <your_keystore_filename> -trustcacerts -file <filename_of_the_chain_certificate>
And finally, import your new Certificate
keytool -import -alias tomcat -keystore <your_keystore_filename> -file <your_certificate_filename>
2.2 Enable SSL in the Pentaho BA Server with a Self-Signed Certificate
Prepare the Certificate Key store
The RSA algorithm should be preferred as a secure algorithm, and this also ensures general compatibility with other servers and components. This command will create a new file, in the home directory of the user under which you run it, named “.key store”.
To specify a different location or filename, add the -key store parameter, followed by the complete pathname to your key store file, to the key tool command shown above.
For example:
Windows:
"%JAVA_HOME%\bin\keytool" -genkey -alias tomcat -keyalg RSA -keystore \path\to\my\.keystore
Unix:
$JAVA_HOME/bin/keytool -genkey -alias tomcat -keyalg RSA -keystore /path/to/my/.keystore
After executing this command, you will first be prompted for the key store password. The default password used by Tomcat is “changeit” (all lower case), although you can specify a custom password if you like.
Edit the Tomcat Configuration File
We need to configure the Connector in the../Pentaho/Server/biserver-ee/tomcat/conf/server.xml file.
- Locate for the below line and comment using <!– .. — tags
<Connector URIEncoding="UTF-8" port="8443"

protocol="org.apache.coyote.http11.Http11NioProtocol"
maxThreads="150" SSLEnabled="true" scheme="https"

secure="true"
clientAuth="false" sslProtocol="TLS" />
- Also, make sure the below lines are also commented
<Connector URIEncoding="UTF-8" port="8443"

protocol="org.apache.coyote.http11.Http11NioProtocol"
maxThreads="150" SSLEnabled="true" scheme="https" secure="true"
clientAuth="false" sslProtocol="TLS" />
- Add the new line below the above-mentioned line in server.xml file
<Connector URIEncoding="UTF-8" port="8443" keystoreFile="<PATH OF KEYSTORE FILE>"

keystorePass="KEYSTORE PASSWORD" protocol="org.apache.coyote.http11.Http11NioProtocol" maxThreads="150" SSLEnabled="true" scheme="https" secure="true"

clientAuth="false" sslProtocol="TLS" />
Trust a Self-Signed Certificate
The instructions below explain how to complete the trust relationship between the BA Server (when it is configured for SSL) and the User Console.
- Change to the home directory of the user account that starts the Pentaho BA Server and Pentaho User Console processes or services.
cd ~
- Using the default settings suggested by Pentaho, this will be /home/pentaho/.
Execute the following command, changing the store pass (pass in the example) and keypass (pass2 in the example) accordingly:
key tool -export -alias tomcat -file tomcat.cer -storepass pass -key pass pass2 -key store .key store
- Change to the $PENTAHO_JAVA_HOME/jre/lib/security/ directory.
cd $PENTAHO_JAVA_HOME/jre/lib/security/
- If you are on Windows, environment variables are surrounded by percent signs, as in:
cd %PENTAHO_JAVA_HOME%\jre\lib\security\.
- If you get an error about this path not being valid, then use
JAVA_HOME instead of PENTAHO_JAVA_HOME. - Execute the following command, changing the alias (tomcat in the example), the file path to the certificate (the current user’s home directory in
the example), and the store pass (pass in the example) accordingly:
keytool -import -alias tomcat -file ~/tomcat.cer -keystore cacerts -storepass pass
Note: If the path to your certificate involves spaces, you must either escape the spaces (on Linux, Unix, and OS X), or put double quotes around
the path (on Windows) in order for the command to work properly.
- Execute the following command and make note of the MD5 sum for the Tomcat entry:
key tool -list -key store cacerts
- Change back to the home directory of the user account that starts the BA Server and User Console, and run this command:
key tool -list -key store .key store
- Compare the Tomcat entry’s MD5 sum to the one you generated previously and ensure that they match. If these sums do not match, you’ve made a mistake someplace in the certificate trust process. Go through the steps again and ensure that you’re working with the right user accounts and directories.
- The BA Server is now configured to allow access via SSL.
2.3 Change the Pentaho BA Server Fully Qualified URL
If you switch from HTTP to HTTPS, you must also change the Pentaho BA Server’s tokenized fully qualified URL value to accommodate for the new port number. Follow the directions below to change the fully qualified URL.
- Stop the BA Server if it is currently running.
- Navigate to the pentaho/server/biserver-ee/pentaho-solutions/system directory.
- Open the server.properties file with any text editor.
- Locate this element and modify the port number to match your SSL-enabled port number(eg. 8443).
fully-qualified-server-url=https://localhost:8443/pentaho/
- Save and close the file.
- Start the BA Server and make sure that it is available through HTTPS on the specified port.
The BA Server is now configured to communicate on an SSL-aware port.
3. Summary
You should always protect all of your websites with HTTPS, even if they don’t handle sensitive communications. Aside from providing critical security and data integrity for both your websites and your users’ personal information, HTTPS is a requirement for many new browser features, particularly those required for progressive web apps.
It’s always better to go with a Trusted CA Signed SSL Certificate over a Self Signed Certificate.
As the browser community trusts them and they are allowed to issue SSL certificates to websites that display the standard trust indicators and avoid those pesky warnings. Self-Signed certificates don’t receive those same benefits, despite offering basic encryption.
3.1 References
Configuring Tomcat for CA certificates
http://tomcat.apache.org/tomcat-8.0-doc/ssl-howto.html
